Crayons & Cuties in Kindergarten Home About Me My Classroom My Shop Image Map


Sunday, March 20, 2016

Easter Fun!

Happy Spring!
They are predicting a winter storm here in NY, but my mind is on Easter and Spring!

Here are a few things I will be doing with my kids this week!

First up are these adorable cards!
These are pictures from last year and they came out so super cute!


I gave each child 2 pieces of 8.5x11 white construction paper that I stapled together.
I showed them out to make an oval that 'holds' the staple.
They then cut the oval out.
They decorated the oval to look like an Easter egg (I had a few books with pictures to show them different examples of how eggs could be decorated.) 

I had them flip the egg up and on the 'inside,' or other oval, I showed them how to make a bunny face using directed drawing.

For some kids I drew a faint line for them to cut (just make sure you open it before they cut or they will cut through the rabbit's face too!)
For others, I did the cut.

I then had them add pink to the middle of the ears!


We pasted them to spring-colored construction paper 'cards' and then wrote a message inside.

Next is this fun center!

I saw an idea on Instagram posted by Mrs. Jones's Creation Station about using the carrot 'eggs' and letter beads, but it was only for letter ID and my kiddos are past that, so I modified it a bit!  (You can click the hyperlink and see her post and grab her free printable!)

I found the carrots at Michael's Craft Store (although I hear they are also at Dollar Tree and Walgreens!)

and filled them with black beans and the letters the kids would need to complete the printable.

Because I have kids working at two different levels right now (ready for CVC words and those still working on identifying initial sounds), I made two different versions.

They will shake the eggs, find a letter, ID the letter and then find the picture that begins with that letter.
If completing the CVC printable, they will tap out and write the entire word.
If completing the initial sound printable, they will simply write the lowercase letter (beads are upper) to match the picture that begins with that letter sound.

You can find the printable FREE by clicking HERE!
These are the letter beads you will need:
b, c, f, g, h, j, k, l, m, n, p, r, s, t, v, w, z

If you don't have letter beads, you can use dried lima beans and a sharpie to write the letters and then put them in the carrot/egg with the black beans as 'filler!'

Next up is a gift I will be giving my students on Thursday!

On a recent Target extravaganza, I came upon these boxes of PlayDoh and Spring Fruit Snacks
The fruit snacks were $1.99 for 12 packages and the PlayDoh was $5 for 10 eggs of 'doh!'
(You can also whip up a batch of homemade playdough and put that in plastic eggs from the dollar store if you are trying to conserve some cash!)

I put a bag of snacks and a 'doh' egg in a candy bag and stapled a little ditty on top and 'signed' the back:

Super cute, not too sugary and fun! 

If you'd like to do the same, I put the tag in this FREE download!
(It has a blank spot to sign your name and I made a version for 'her' 'his' and 'our' class to accommodate everyone!) 

Here are a few other things we will be doing this week:
Last year we used this the cute image created by Graphics From the Pond as inspiration for this chick drawing!  They used a black crayon and then let them paint!

These rabbits were also directed drawings that we painted!

And if you are planning on dying eggs with your students (or own kids) this works GREAT!
I got the whisk from the Dollar Store...Just slip in the egg inside and let them dunk it!
Less spills...splashes and cracks!

Be sure to check out my other posts for 10 Ideas Using Plastic Eggs and Using Dollar Spot Finds for Spring Centers!


'Hoppy' Spring!
Until next post,

Sunday, March 13, 2016

Let's Make Learning 'EGG'-citing!

Spring is (nearly) here so grab those plastic eggs and...

Today I am here with 10 ways to use plastic eggs for ELA, Math and Science!

I always do an Oviparous Animals unit in my kindergarten classroom each spring.
Because I am a 'theme nerd' and have a need (sickness maybe?!) to make everything connect, I have my ELA and Math centers include eggs, as well!

Here are 10 simple, relatively no-(major) prep ways to incorporate plastic eggs into your centers!
They range in grade level from PreK-2 depending on how you offer support and/or enrichment!


You can also have a recording sheet that has 'Real' and 'Nonsense' listed on top.  As students twist and read a new word, they can record if it is a 'real' or 'nonsense' word!


Focus on just one vowel, a combination of a few students are having trouble with or a mix of all 5!


Don't have enough magnetic letters?
Click here to download this FREE editable pack!
You can type in sight words, CVC words, vowel pairs, vocabulary words, spelling words, digraphs, blends, letters, etc!  Print, cut, stuff!  
Your center is all set!


Use it both ways for differentiation!
Target words your students are working with, or need more practice reading and writing!
Type, cut, stuff and you are ready to get crackin'!


So easy to set up!
Want to make it more appropriate for upper elementary?
Put 2 'blue' and 2 'green'
Students make the blue number from both dice (either add the two numbers, use it as 'tens and ones' or multiply) and do the same for the green.
(Ex. roll a 6 and 2 for blue.  It could be 8, 26 or 62, or 12)
They compare the numbers they created to find the greater/less than number!


I made 0-5 dice so that the greatest sum would be 10 for my kinders.
To support students, place counters or manipulatives for them to use to assist their computations.
To make it more appropriate for upper elementary students place 10, 20 or 30 sided dice in the egg for students to add/subtract!


Decomposing is a difficult skill for many kinders to understand, but I found using the double sided counters really helped them!
You can read more about how I had my kinders use eggs and counters on THIS POST.
(You can even find free recording sheets to download!)


Recruit parents and fellow teachers to save egg cartons for you (and maybe even donate some plastic eggs since this activity requires quite a few)!
The idea of making an egg carton into a 'ten frame' came from a post back in January 2014 by Laura at Differentiation Station Creations!  
And it works PERFECT for this activity of using eggs to make groups of 10!

You can read all about how I used it in my kindergarten class, and download the free spinner and recording sheets on THIS POST!


You can make the eggs match on the same color (top/bottom) or mix the egg colors for a bit of a challenge!


This is just a few ways of using the eggs with numbers!
There are so many other ways to practice numbers with eggs!

So now we are back to the oviparous animals unit!
I use the eggs to introduce the unit to my kinders!
Each child cracks open an egg (I do have some duplicate animals in eggs because I simply ran out!) to learn about what animals are oviparous!
I use different size eggs (the tiny ones to the extra large) to show how eggs can be different sizes.
I highly recommend reading Chickens Aren't The Only Ones by Ruth Heller if you plan on conducting an oviparous animals unit with your students!


I also have several lifecycle crowns that are a great way for students to display what they learned about oviparous animals!

and there is also a butterfly lifecycle freebie available for download:

I hope you and your students have an 'egg'-citing time learning math, words, letters and more using plastic eggs!

Do you teach your students about oviparous animals?
Are you a 'theme snob' too- and feel the need for everything to coordinate?
I'd love to hear from you!

Until next post,

Tuesday, March 8, 2016

Dollar Spot Finds for Spring Centers!

Last weekend it happened...
I got sucked right into the deep red hole...otherwise known as Target Dollar Spot!

I went in to get a child's birthday gift and came out with a cart LOADED with goodies from the famous 'Dollar Spot!' 

With Easter in March this year, I wanted to grab some things I could use in the next two weeks, but also some 'spring'-ish goodies that could last into April.

If you too went from hand-held basket to fully loaded cart, here are some ideas on how I am going to use what I found!

First Up...
Real/Nonsense CVC Word Sort!

I got a bunny pouch in both white and pink to use for holding the butterfly die cuts.
Bunnies and butterflies are spring icons, so this center can easily go into April..and May..if need be!

The die-cuts came in a pack of 16 and I used a little over 2 packs to make the set you see here.
I chose to write the words with a sharpie directly onto the butterflies, but if you don't like your handwriting, simply type the words on address labels and peel/stick them onto the butterflies!  You can even buy clear labels so you don't see any white!

I printed up 2 signs 'Real' (thumbs up!) and 'Nonsense' (thumbs down) and used the C-U-T-E bunny clothespins I found in 'the spot' to hold the signs onto the pouch.
No clothespins- no problem- put a bit of velcro (scratchy side) on the back of the card and it will stick to the felt pouch- or tape them!  You can even write right on the pouch, but I wanted to be able to use the pouches for different things, so this gives me an easy way of changing them out!
[We used a 'thumbs up' and 'thumbs down' in our class when we read CVC words during word work to determine if they are a real or not real word.] 
 I also made a recording sheet so that they can list the words they worked with (it also gives us a bit of handwriting and letter formation practice (wink, wink!))


Because I chose to write out so many words, I also made a back for the recording sheet for my fast finishers!  It also allows them to use one of the 'real' words in a sentence!

 Start to finish this center probably took me TOPS an hour to prep- but that is including making the label pockets and recording sheet (which you can download for free at the end of this post!)!

Now onto some math!
Addition/Subtraction Bunny Sort

Again I used those C-U-T-E bunny clothespins to label my pockets!
I simply wrote numbers 0-5 on them because we are working on fact fluency, but no matter what numbers you are working with, you can program your bunnies to match...and if you decide to focus on different numbers, no biggie!  Just erase and re-write!
If you don't like your handwriting, you can opt for number stickers too!  They would easily peel off to change numbers, as well!

I purchased the bunny die-cuts (if you have an Ellison machine, you could use die-cuts from there, but with 16 to a pack for only $1, I felt my dollar was well worth the time it would take to cut them out!)

We just finished addition and are working in subtraction now, so I did a set of both.
I clipped the bunnies to the pouches and they are ready for sorting!

No matter which you choose the pouches work the same!  You can even combine addition and subtraction facts or focus only on one!

I made a recording sheet that can be used 2 different ways- they could simply write the answer or they could write out the whole number sentence from the bunny die-cut with their answer!
For those students that need to use manipulatives, I picked up a few packages of the famous Dollar Spot erasers!  I will have them out at the table and they can use them to help answer the problems.

We might also use the erasers/bunny die-cuts/recording sheets without the pouches!
Pick a bunny, show how to solve using the erasers, write your problem/answer on the sheet!

You can also use the bunnies are 'flashcards' for fact fluency during 'down times' throughout spring!  This might make waiting for buses a bit 'hoppier!'

Again- this took me all of 40 minutes to prep- including creating the recording sheets (which are free for you to download at the end of the post).

Last but not least...
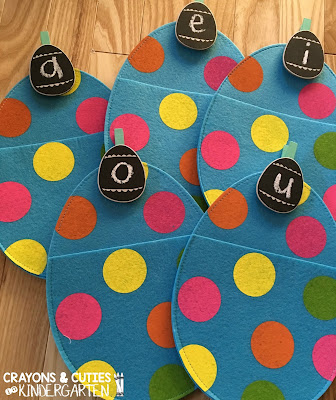
Medial Sound Egg Sort

For this one I am using the felt egg pouches and egg die-cuts, as well as egg clothespins!
Same as bunnies, I programmed the eggs with vowel letters

and clipped each one to an egg


I printed a bunch of CVC pictures on 2x4 mailing labels and then cut them in half (I was able to fit 2 pictures per label) and stuck each one to a die-cut egg

The kids will look at the picture, determine the medial (vowel) sound and then place the egg in that pouch.  I made a recording sheet for them to practice writing the CVC word, as well!

An alternate way to do this would be to stick a picture on each clothespin egg and then put CVC words on the egg die-cuts.  They would read the word and determine which egg it goes to.  

This one took a bit longer to prep because the of the peel/stick, but I don't think I spent even an hour doing it!  

The egg picture cards can also be used as flashcards (like the bunnies) during downtime for determining vowel sound, or 'tapping' out the word.  You can also use them during guided reading/small group instruction with magnetic letters!  

OR put magnetic letters in a plastic egg...have them 'crack' it open, build the word and then find the matching egg picture card!

Since I know teachers LOVE the dollar spot, I am sure many of you picked up a lot of the same goodies, so I put all of my recording sheets, labels for pouches and the CVC picture labels into this free download!
(The labels were created in Word to be printed on 2x4 mailing labels but I had to convert them to a PDF to adhere to the clip artist's terms of use.  If they don't print aligned to the labels, you can try using a full sheet label and cutting them from that.)

If you are looking for more Easter/Spring CVC and/or math resources, be sure to check out my Spring/Spring Holidays custom category in my TpT Store (there are some freebies too!)

ENJOY!
Happy Shopping and Spring Center Prepping!

Related Posts Plugin for WordPress, Blogger...