Crayons & Cuties in Kindergarten Home About Me My Classroom My Shop Image Map


Showing posts with label Playdoh. Show all posts

Wednesday, December 16, 2015

Snow Dough!

We still have 6 days of school left until break so I am bringing in some reinforcement...
I found the recipe on this blog post from Dazzle Design via a recent Pinterest escapade and knew it was something I wanted to do with my students (and boys!).

The recipe does not call for many or 'off-the-wall-hard-to-find-expensive' ingredients!
You simply need:
*baking soda
*cornstarch
*warm water
*peppermint extract

SIMPLE!

So I gathered my supplies and got to work!
Put 2 cups of baking soda and 1 cup of cornstarch in a saucepan and stir to combine.
Add 1 1/2 cups of warm water and 1 teaspoon of peppermint extract.

Stir to combine over medium heat and bring to a boil.

NOW learn from my mistake!
My first batch I was afraid of burning and took it off the heat too early:

This is NOT what you want it to look like:
It was WAY too loose!
(Don't worry- I wound up saving it!  If you do this too, just put the mix back into the pot and heat for a bit longer until it thickens!)

SO, keep the mixture on the heat for a bit longer and just keep stirring.
As it starts to thicken and resemble 'frosting' remove it from the heat and continue to stir as it thickens.  
This is what is should look like:
And then pour it onto parchment paper (or straight on your counter) to cool

If you are pressed for time (like I was) you can pop it in the fridge
then take it out, knead it a bit and break into balls.

The recipe on Design Dazzle calls for iridescent glitter. I didn't have any (and I get nervous letting kids man-handle play with dough with glitter for fear of them wiping their eyes after) so I chose to leave it out!

Time to pack up the dough!
Put each ball into a bag (I had candy bags, but a ziploc would work too!) and tie it with ribbon.
I added this cute little tag (stapled it to the ribbon) so that they can take the tag home after then RIP the bag open and play with it!

Our dough is coming from our classroom elves, Harvey and Holly:

I'm going to let them play with it for a bit and then let them take the dough home.

My kindergartener took it for a trial run for me.  It was really cool and was easy to use to form a snowman:
I'm going to put out some beads, sequins and pipe cleaners so they can decorate their snowmen!

Want to bring in some snow dough?
I made 3 batches and it gave me 24 balls of snow.
You can grab the tag and note here:
I put a 'generic' note and a sample of my note in the free download.

I can't wait to share some pictures of my students using the dough and the creations they come up with!

We'll also be making 'candy cane' playdough later this week!
Come on back to see all the fun!
Until next post,

Monday, November 16, 2015

Thanksgiving Fine Motor and Math Fun!

My students LOVE play dough!
I love giving them the chance to work on some fine motor skills, so next Wednesday, the day before Thanksgiving, we are going to review identifying, counting and ordering numbers 0-5 using play dough!

Are you ready to make a play dough turkey?
It's super easy!

First either purchase or make brown play dough.
If you are choosing to make it, it adds another element to fine motor work!
Mix equal parts red and brown play dough by kneading them together until they are fully mixed:
The amount of red you use will alter your shade of brown.  The one on the left had more red than green.  The one on the right had more green!

Now it's time to build a turkey!
I had some beads around my classroom, but you can use scraps of paper too!

Roll 2 balls of play dough and stack them:

Then add eyes, a beak, waddle and feet! 

Cut pipe cleaners in half (thirds would work too!) and stick them into the bottom ball of the turkey: 

Here is the turkey ready for some math fun:

Decide on what you'd like your students to practice!

Maybe ordering numbers from 0-5:

Maybe roll a number, ID the number, count that many beads and show it on a 'feather':

Maybe you are working on addition!
I have these neat dice within a dice (from Lakeshore) but you could use 2 dice. 
They add the two numbers and show the sum on a feather:
(They can even use 2 different color beads to show what parts were added and/or use a dry erase board to record the number sentences!)

Or maybe you just want them to practice some fine motor work!  Have students flip a sand timer (I found mine at Dollar Tree 'teacher section') and put beads on the pipe cleaner until the time runs out:

No matter what skill you choose to practice, your students are sure to LOVE it!
They will even forget they are 'learning!'

Be sure to check out my post that has this FREE Thanksgiving retelling bracelet/story:

as well as my Thanksgiving resources (both paid and free):

Wishing you, your students and family a very happy Thanksgiving!
Until next post,

Saturday, September 26, 2015

Shapes..Fun and Freebies!

We've been working in our shapes unit for about 2 weeks!

Here are some of the fun things we have been doing with shapes that incorporates math with fine motor work, as well as ELA skills!

PLAY DOUGH!
I can't emphasize enough how important play dough is in a kindergarten classroom!
Each of my students has his/her own container of play dough that they keep in their cubby.  If we have a few minutes at the end of a lesson I will have them get their play dough and make something with it pertaining to the lesson.

Here they were 'challenged' to make a circle, square, triangle and rectangle with their dough:

PETE THE CAT!
We had been reading a lot of Pete The Cat books the first week of school.
Although Pete's buttons were all the same shape in the story, we used it as a springboard to talk about different shapes buttons COULD be!

I gave each of them a rectangle piece of paper (About 4x6 size) in 4 different colors.
I gave clues about a shape using its characteristics we had talked about (Ex. I have no straight sides and no corners- who am I?  CIRCLE!)

They chose the color they wanted for that shape and drew it using a black crayon- I modeled the 'how to' on the board.

Once they were all drawn, they cut them and glued them to a piece of paper that had this phrase glued to it: '____________'s 4 Groovy Shape Buttons!'

And here they are on display in our classroom! 

INTERACTIVE WRITING and SHAPE BOOK
We have been working with the sight words 'a' 'I' and 'see' for the past 3 weeks and are using them during interactive writing.
To connect to math, we made a chart reviewing the shapes we had learned about to display in our classroom as our 'shape' poster!
I had pre-drawn and labeled the shapes.
They identified the shapes and helped complete the sentence using the sight words we had learned.

We them read and completed a shape book!
The students were amazed to see that he sentences they just wrote were the same as the ones in the book!  
'We are writers!  We are readers!' 

MATH JOURNALS
I stared math journals this year and am happy to report that they are going really well!

The students complete them about 3 times a week- depending on how much time we have after each lesson.
They glue the prompt into their books and then complete what it asks them to do while I walk around and date stamp/assist students.
We share our journals with our table friends!

They used their math journals during the interactive writing lesson described above, as well!  As we wrote the sentence and read it, they then drew that shape in their journal!

Yesterday completed our shape unit.
I made a quick assessment for both finding, and naming, the shapes we are required to learn (circle, square, rectangle, triangle, hexagon, cube, cone, sphere and cylinder).

This was given whole group:
It shows me at a quick glance who has mastered finding the shapes we learned and who needs a bit more practice and with what shapes.
(BTW it is not an issue of not knowing colors- I had them hold the color I asked for up in the air before coloring and if they didn't have the right color, I helped them find it)

This one was completed while they were coloring their shape book (above).  I walked child to child with my shape 'chart' and asked them what each shape was.  I marked it on the recording sheet:
If they knew them all, I just put a big check over the paper,
If not, I slashed it.
I noted if they named it a different name (Ex. 'ball' for 'sphere').

I will pull these out when I pull math skill groups to go over shapes for particular students and then re-visit them when it is time for report card assessments.  I'll use a different color pen to indicate progress and then share the papers with parents at conferences.

We re-visit solid shapes again in a few months too!

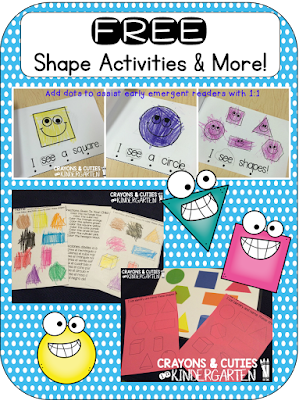
In addition to the activities above, I also made a few shape printables I have used for morning work and math stations.

(I don't have the Pete the Cat craft label or math journal prompts in here- sorry!  Once I have all the math journal prompts for the year made and 'tested' I will be adding them to my TpT Store. For Pete the Cat, I just typed up the header, printed several per page, cut into strips and glued to the top of the paper.)

You can find this FREE reader in my store:

Since Fall is here, this is a perfect craft to review shapes!

And here are a few other shape resources I have:


Hope this helps make your shape unit even more fun!
Until next post,
post signature

Sunday, August 30, 2015

Back To School Bash!


I know some of you are already 'back to school' and some of us are starting soon!
The girls and guy of 'The Pack' have come together to bring you a hop filled with fabulous tips, awesome freebies and incredible giveaways!

How It Works!
Our hop is a 3…2…1… BACK TO SCHOOL BASH because each member of The Primary Pack will be giving you 3 teacher tips, 2 giveaways (one on each of our blogs and one BIG one on the Primary Pack), and 1 freebie!

To enter our BIG giveaway, you need to head over to THE PRIMARY PACK first! As you "hop" through each of our blogs, you will collect a letter from each of us… 28 total. Those letters spell out a secret code that you need to enter our BIG giveaway! You will use the secret code to enter the rafflecoptor on The Primary Pack at the end of the hop.
 You need to collect the letters from us IN ORDER, so please make sure that you start from the beginning of our hop. Click on the button below to head over to THE PRIMARY PACK and start our BACK TO SCHOOL BASH!!

If you have already visited the first 9 stops along the hop, you are ready for stop 10 from me!


One thing I do each year is type up all the kids names on address labels.
I print about 6-8 sets of the labels.
(You'll see there are duplicates- I do that to not waste labels!  The next page had duplicates of row 2 so it evens out!  I also leave some blank to fill in names of new students that are added to my roster last minute!)

They come in handy for:
1. Labeling folders/books/crayon boxes, etc. that come in unlabeled- just slap it on there as they take it out of their bags!
2. To label a child's work that cannot write their name yet.
3. Name tag for when going to a special area teacher.

I have also used them to stick on a paper for a child to copy for name writing and/or when using magnetic letters to build names!

I have also printed the list on regular paper (not labels) to use for check-offs for assessments, projects, etc.!


Use your 'scraps' for sensory bins/buckets!
If you use scrapbook paper to make things for your classroom (you can read how I use it to make 'backs' for my games here) and have scraps don't throw them away!
Instead, throw them through your shredder!

It makes a great mix that is perfect for sensory bins/buckets!

You can even use your junk mail shreds!
 

Throw some magnetic letters in there and have kids search for letters in their names!
Throw some manipulatives in there and have kids search for items of certain color or shape!
Throw some objects from around your room in there and have them search for items that begin with a particular letter!

You can see how I used these shreds here.

You can even make 'seasonal bins' by using particular color papers to make shreds!

The shreds can be stored in ziploc bags for use again next year or tossed into a recycling bin!

Make play dough with your students!
I use an EASY recipe I got from The Imagination Tree that is no-cook and lasts for 6 months!

We start our year with this magic play dough:
(you can download the tag for free here)

And each month we make another batch that we use in centers and they replace their play dough 'cups' with the new flavor of the month!  They get so excited to take the 'old' dough home too!
We have made:
Apple Pie Playdough
Candy Corn Playdough
Licorice Playdough
Pumpkin Pie Playdough
Peppermint Playdough
Gingerbread Playdough
Snow Dough
Sugar Cookie Playdough
Chocolate Playdough
Glow-In-The-Dark Playdough
Coconut Playdough
Watermelon Playdough

You can find many variations and ideas on The Imagination Tree too!

I usually ask parents for flour, salt, cream of tartar and oil donations throughout the year.
They are usually eager to donate after they see how excited their kids are for the different doughs they bring home!


In kindergarten we work on names for the first month (maybe longer)!

This summer I purchased letter beads to use in my classroom for names and sight word building!


After download, you just click in the text boxes to change the letters to the letters of your students' names!

Here are some pictures of my soon-to-be-kindergartner practicing it: 

I put the paper in a re-useable sleeve and used dry erase crayons, but it can be completed without the sleeve and other writing instruments!

If you don't have letter beads, so worries!
You can have students use magnetic letters, letter tiles, letter cubes, etc!
(You can even put the paper on a cookie tray so that the letters 'stick')

After we master our names, we will move onto building sight words: 


Now to the giveaways!

The 'packers' have collected funds to purchase a Silhouette Cameo to giveaway!
 
If you don't have one...you will certainly WANT ONE!
And if you do have one, you could be someone's forever best friend and gift it to them for back to school!
I finally broke out my Silhouette Cameo last June and am wondering why I waited so long!
Here are just a few things I have done with it this summer to prep for back to school...
These are cut-outs from Dollar Tree!  I used the cameo to cut our letter and number 'stickers' to make center matching games! 

This is thanks to fellow 'packer' Kourtney Payton!
She made these templates and sent it to me so I could add it to my Dollar Tree garbage can! 

These images were freebies from Teaching in the Tongass stuck to Target Dollar Spot cans! 

And my most recent...a little 'Back To School' gift for my boys' teachers!
I still need to add the tag 'I am 'tickled pink' to be in your class this year!'
Target Dollar Spot can with some pink $1-ish goodies tucked inside! 

Here is the letter you need from my blog to complete the secret code:
GOOD LUCK!

But that is not it...

I am also giving away $10 toward items from my TpT Store!
I added a lot of sight word resources this summer you may want to check out!


So let's do a little check-list before you move on..

All set and ready to hop along?

Wishing you a wonderful 2015-2016 School Year!
AND...
Next time you visit my blog, don't be surprised if it looks a tad different!  
Alexis from Laugh Eat Learn has me next on her list for a new blog design!

Until next post,
post signature
Related Posts Plugin for WordPress, Blogger...