
I hope you brought your appetite! I have joined spoons, bowls and books with 24 other chef bloggers to bring you the 'Cookin' Up A Great Year' blog hop!

I hope you had a chance to indulge in this week's appetizers that were served on Tuesday, Wednesday and Thursday!
If not, click the hyperlinked day of the week to find my posts and links to:


The name building activity is only free through 8/17, so you are going to want to head over to TPT to download it! I will refer to it later on in this post!
And, if you did not already download your 'recipe card' for jotting down notes along the hop, you can find it by clicking here:

If you read my post yesterday about how I was dyeing coconut, you are about to find out why!

It is hard to find a PreK/Kindergarten class that does not start their school year without pulling out:

There are so many great and creative things that can be done with this book!
But this year I am jumping onto the sensory table/tub bandwagon and I wanted to begin prepping some materials to use the first few weeks of school!
This post will give you suggestions and ideas on how you can prep materials for using Chicka Chicka Boom Boom now for easier implementation during the school year!

Finding time for 'play' in our curriculum is getting harder and harder with all the academic demands that are being put forth. So I tapped into my creative side and thought of ways I could use Chicka Chicka Boom Boom to initiate 'play!'
I decided to focus on 'coconut' and am bringing you an array of sensory activities you can incorporate into your classroom using this book as a springboard!
Even if you are not planning on implementing and/or using a sensory table/tub, many of the activities I am posting about can be done without one, so please continue to 'dig in!'
One of my favorite things to do with my kinders is make playdoh! The children LOVE helping and the fine motor benefits of working with playdoh are incredible!
So to connect to the story, lets make some coconut playdoh!
I have made many 'flavored' playdoh in the past, but never coconut. I assumed if I made my basic recipe, and added coconut extract, I would have what I wanted. But I did what any 'sensible' teacher does...I first conferred with Pinterest!!!
I came across a recipe that only called for 2 ingredients and was a NON-COOK recipe- SCORE!!!!
All I needed was some coconut hair conditioner and cornstarch!
How EASY is that to do in a classroom??!!!
I grabbed my 2 'sous chefs' and we gave this recipe a 'taste test!'

When I went to the store I naturally went for the more expensive hair conditioner thinking it was going to have the best smell- NO! The cheapest one- White Rain Tropical Coconut- only cost $1.19- and the smell of coconut transported me right to a beach with a drink, decorated with a paper umbrella, in my hand! I also grabbed the store brand cornstarch- $1.29- so the total cost for this batch of playdoh is $2.50!!!!

We brought in the picnic table from outside and got right to work!

Each 'batch' calls for 1c. of cornstarch


and 5 Tablespoons of hair conditioner

Add the conditioner 1T. at a time

being sure to stir between additions.

It will be crumbly when mixed

simply begin to knead it with your hands

until you can make it into a ball.

and it smells GREAT!!!

Time to put it to the test....
We grabbed funny forks, whisks, a shrimp peeler, corks, Mr. Potato parts and to tie in to Chicka Chicka Boom Boom, some magnetic letters!!

The boys created some fun stuff

and I had them tell me what letters they used, something that started with that letter and/or the sound the letter made!

we even got to practice symmetry!

So how does it stand up to rolling?
Not bad! It sticks a bit to the rolling pan, but if you spread a bit of conditioner on the pin before rolling it worked much better!

It was great for making handprints too!

Our overall 'Zagat' rating is capital F-U-N!

and clean up was a breeze! One baby wipe cleaned the whole table!

We wound up making 3 batches total- which was the entire box of cornstarch and about 3/4 of the bottle of conditioner.
The only 'downside' is that this playdoh doesn't 'store' well. It is basically good for one really good play session, but then needs to be discarded.
So what if you want a coconut playdoh that you can keep for awhile- possibly make with your class one day and then use in a center for a few weeks?
I found this 'Best Ever No-Cook Play Dough Recipe' from The Imagination Tree that lasts for 6 months!
It uses only 4 ingredients and takes 4 minutes to make- and it REALLY is the BEST!!!

For each batch you will need 2c flour, 1/2 c salt, 2T cream of tartar and 2T vegetable oil
She recommends glycerin for shine but mine was at school, so we did without!
I also added in 2T coconut extract!

Mix all the dry ingredients in a bowl

Add 1 to 1 1/2c boiling water. I started with 1c and it needed a tad more. You want it to be completely mixed, yet have a sticky consistency. If adding in extract, do so now. (We have also made it with lemon extract and that was heavenly!!)

Allow it to cool a bit and then knead it until it is smooth and creamy. If you want to add color, now would be the time. Since we were making 'coconut' we kept it white!

I put out our playdoh letter stampers (from Lakeshore) and some other letter stamps we had from the craft store, as well as rollers and playdoh cutters. We kept it a 'letter theme' to tie in with Chicka Chicka Boom Boom! I gave each of the boys his own tub to work in- keep reading to find out how I plan on using them in my classroom this year!
So..how can you use this in your classroom for 'sensory' word study?
How about give your children picture cards of CVC words and have them stamp the word:

Or for those just learning letters, let them explore with all the different letters. Then ask them to name some of the letters, tell you the sound it makes and/or something that starts with the letters they stamped!

You can also use it to practice writing sight words, spelling words, word families and more!

We even practiced rolling the dough into 'snakes' to make letters to spell our name!

I found these great containers for $1 at the grocery store with this activity in mind....

They will be 'mini sensory tubs' for playdoh! They are big enough to fit a nice lump of dough, a few letter stamps a roller and scissors! I have four so each child will have his/her own at a center for the beginning of the year 'word study' center!

Later on in the year our tub will be a bit more 'structured.' It will have the lump of dough and specific letter stamps and a roller. There will be picture cards for CVC words and the students will roll out their dough, select a card, stamp the word and then record their word on a piece of paper.

Since the dough lasts 6 months I don't have to worry about making new batches each week!
We can even change up the scents to match the seasons....pumpkin spice, peppermint extract, etc!
Again- this dough recipe receive a Zagat rating of capital F-U-N!

It honestly was the simplest yet BEST homemade playdoh I have ever worked with!
Be sure to check out her playdoh from A to Z recipes and suggestions for sensory fun through the alphabet!
In your classroom, for the start of the year, you could use the playdoh for 'free explore' or use it in a center with playdoh mats! This set of FREE mats from Over the MoonBow are beach themed (perfect for our coconut scent!) and offer practice with numbers 1-10!

You can also use this simple blank mat I made to practice forming letters, numbers, names, shapes, etc!
Or simply use it as each students' workmat for free play!

(simply right click and save as a picture. Insert it into a document and scale to any size you need/want)
So what other sensory fun did we 'cook up' with a Chicka Chicka Boom Boom theme?
How about some sensory tub fun using the rice, macaroni and coconut that we dyed?!
If you missed the post with all the directions, how-tos and tips on dyeing, please click:
I was going to have my hubby make me a sensory table from a pin I saw on Pinterest, but then thought about how I don't really have a place to put it that wouldn't be 'in the way!'
I decided to go with 'tubs' and found 4 craft storage bins on clearance at JoAnn's!
I made some coconut trees using toilet paper holders and green printing paper:


And then filled the tubs with rice for our first 'helping' and collected items that fit a 'coconut tree' theme- yellow pom poms for the moon, blank/brown pom poms for the coconuts and magnetic letters:

I also made an alphabet matching game using coconuts. I printed it on decorative scrapbook paper so that when they were in the tub they added some color and fun!


The boys had a blast 'digging in' and were eager to find matches!

Here he found the 2 matching coconut cards AND its matching magnetic letter!

I had left over felt letters from the birthday chair cover I made, so I threw them in there too!
Since we didn't have a 'W' magnetic letter, he chose to match the picture to one of the felt letters!

And for 'G' they found everything!

Now if you plan on using this book for numbers,

You can use your 'coconut tree theme' sensory table/tub for number recognition and counting too!

and be sure to download this freebie game from Anita Bremer!

It's a cute number ID game!
We also 'played with our food' in a macaroni based tub:

But the best was to play in in the coconut!

Look at how vivid the colors are!!!

The coconut letter and picture cards stand nicely in it!


This time we also practiced using the recording sheets- I had them match letter to picture and also picture to picture and letter to letter. They loved filling up their paper! Later that day they also colored their pictures and told me the letter names/what letter the pictures started with as they colored- much like a 'center extension' activity for the classroom!


The sensory input from smell and touch was amazing...and of course I let them 'sample the leftovers!'
We practically had a 5 senses lesson when all was said and done!
Which leads me to...

Explore a REAL coconut with your students!
Have them feel it, shake it to hear it, describe what it looks like and then...
CRACK IT OPEN!
Have students smell it and then taste some!
You are probably better off with shredded flakes for the taste test than carving up the coconut meat!
So what other things can you prep now to help prepare for some awesome 'Chicka fun' once the year starts?
How about some REALLY big letter fun!
I purchased this set of letters from Sonya DeHart (she is having an amazing $1 sale until 8/31!!)

I simply inserted a 2x4 table (portrait layout) and inserted the letters in as you would a picture file.
Printed them on cardstock and laminated using my home laminator! This has been a HUGE time saver for me! It is only $30 on Amazon and works PERFECTLY! No more wasting time standing on line at school waiting for the laminator/it to warm up!

I collected some goodies from around the house and a bowl of plastic letters

I then raided the recyclables for a cardboard box and made this coconut tree (you could also use 12x18 pieces of brown construction paper)! I cut out some leaf shapes and just laid it all down on the floor (no tape or glue)
I placed the letters that corresponded with what I had in the bowl onto the tree and I was ready to call in my sous chefs to help me 'cook up' some letter sound fun!

Working on LARGE scaled items is really beneficial for kids who have the 'need to move!'
My little ones are MOVERS and SHAKERS so if we can do our learning by standing up, walking and moving about, they are better focused!
You may find you have students that 'learn best' in that way too, so here are some fun things you can prep now to have ready to do with them in centers and whole group learning situations!

They simply reach into the bowl, name the object, make the sound they hear in the beginning of the word and then place it on the letter that makes that sound!

You can even put more than one item in the bowl for each letter sound.
Want to use it again later on in the year? Have students listen for the ending sound and/or use only the vowel letters and have them listen for the medial word in CVC words!
SO proud he did it all by himself!

You can use the same letters and tree for upper/lowercase letter matching!


You can differentiate by using letters particular students are having difficulty with and/or need more practice!

We also used the letters to build our own names up (or actually down) the coconut tree!


Hooray (and the tree is just as big as me!)


To practice identifying the letters in our names I crumbled up some brown paper bags and we 'threw coconuts' at the tree. When they landed on a letter we had to say what letter it was. When it missed, it was time to get up and move!

When we were all done everything folded down flat and is easy to store!
You could make a baggie for each student to practice building his/her name (either on the tree or just on the desk, floor, etc) or just place an array of letters and have students find their letters.

Later on in the year- pull that tree and the letters out again- but this time give them picture cards for CVC words and have them build the words on the tree! Use the tree for building sight words too! Add in a recording sheet for accountability and extra practice! They will love having the tree back out!
How else can you use these letters so that all your 'prep' pays off all year long?
*Put magnets on the back and use for word building on your Eno/Smart/Dry Erase board
*Hang them around your classroom for a 'read'/'write' the room activity
*Put letters around the room. Turn on some fun music and have students walk from letter to letter. When the music stops they must say the name (and/or sound) of the letter they are standing on!
*Use them in your sensory table/tubs
*Put paperclips on them and put them in a kiddie pool (or large piece of blue paper) and students can fish for letters
*Give each student a letter and then have him/her walk around the room and stand next to something/find something that begins with that letter
Now how about some 'big movement' math!
I covered a box with brown crumpled paper so that it resembled the trunk of a coconut tree.
I used the math pieces from the Coconut Tree Sensory Tub Activity Pack

I pulled out all the number coconuts and left the button (counting) coconuts in the 'tree.'
I had printed them on scrapbook paper so that when they were turned over they looked not only decorative, but you can't see the number underneath!
Flip a number over and identify it...

Find the coconut that has that many buttons

OR
You can put the paper 'coconuts' in the 'tree' and pull out that many coconuts!

He loved 'diving' into the tree...

and had a lot of fun!

When we were done matching I had him order the coconuts from 1-10 to make a 'number line!'

All this work is sure to 'stir' up an appetite!
So lets make a name building snack!

For this we are going to use rectangle crackers (you can substitute graham crackers), Cheez-Its 'Scrabble' (you can substitute AlphaBits cereal), green pear (you can use a green apple), Whoppers (you can also use raisins) and peanut butter (you can use icing)

Use an apple slicer to cut the pear/apple into 'leaves'

I wanted the boys to practice building their names so I pulled out the letters to spell their names and put them in a cup


But you can also just put a plate of letters out and have students 'decorate' their tree with letters because it would require a few boxes and prep to pull the letters of the names of everyone in your class!
Lay out everything you need....

and begin building!


So fun...and boy were they yummy too!


Now I would love for you to be able to do this with your students, but I know some schools don't allow food crafts and/or there are food allergies to contend with, so I put this together:

It includes a color and black & white 'workmat' to resemble the food craft and a set of paper cracker letters!

You can laminate the pieces for a center activity and/or allow students to glue for a take-home project!

This pack is FREE for this weekend ONLY! Be sure to head there now to download it before you are left with an empty belly!
And while you are there, be sure to check out and download my Chicka Chicka Boom Boom inspired 'forever freebie':

There are rhyming mats to use in a center and then this adorable hat to make to show off rhyming knowledge:
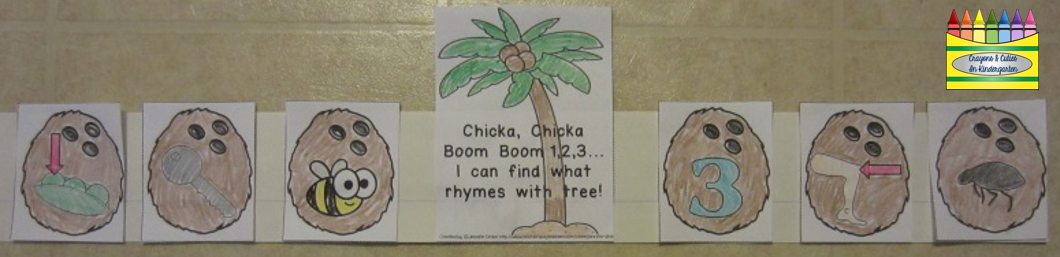

the kids have to find the coconuts that rhyme with 'tree' to complete the activity- its a perfect way to end your Chicka Chicka Boom Boom unit!
Ready to get up and move?
One thing I always do is search YouTube to find fun videos, songs, etc to go along with my read alouds! For some students 'hearing' the story in a different way taps into their learning style so that they can take the most from a lesson!
I found this adorable 'sing-reading' of Chicka Chicka Boom Boom that your students are SURE to love!
I dare you to listen to it without beginning to bop and dance yourself! Now imagine the excitement it will 'stir' with your students!
So, 'as the sun goes down on the coconut tree...'

I hope my post 'filled your pots & pans' with lots of delicious and fun ways to use Chicka Chicka Boom Boom in your classroom this year!
If you are looking for some other resources for Chicka Chicka Boom Boom I have these in my TPT Store and they are all on sale this weekend:


You can also find more ideas and resources on my Chicka Chicka Pinterest board:

I also created this pin for you that will link right back to this post!

Now for...

If the recipes for learning and fun did not fill your belly, be sure to try out this recipe for Crispy Coconut Chicken With Coconut Rice!

It is healthy, delicious and doesn't require a great deal of prep! It is noted as an 'energy boost' food too! Total prep time is about 20 minutes and cook time is 30-35 minutes.
Are you ready to win....

And with that let me just say...
'Chicka Chicka Boom Boom-
Look there's a full moon!'

"The next chef blogger is out of bed,
And this is what she said...
'Dare double dare,
come visit me...
I have something tasty...come and see!"


Hope your year is filled with delicious fun for each and every little one!
Until next post,


Chicka Chicka Boom Boom is one of my favorite stories to start the year with! I love all of these ideas, especially the play-doh! I have to make that! Thanks for sharing! I also love the super cute freebie!
ReplyDelete~Kourtney
kourtneypayton83@gmail.com
Mrs. Payton's Precious Kindergarteners
Oh my goodness! You get the award for the most labels and pictures girl! This was absolutely awesome!!! I am pinning this for my Cooking with Kinders week! :-)
ReplyDeleteI am loving this amazing post!! I kept reading and got more excited with each new activity!!! You are amazing :) I love all the ideas, especially the large coconut tree. So great! Your kids are going to LOVE it!! I love seeing your boys get to interact with everything. They are absolutely adorable!!
ReplyDeleteLaura
Great ideas for Chicka Chicka Boom Boom! Your boys are so cute!:)
ReplyDeleteThis looks like so much fun! I love this song with the alphabet! Thank you!
ReplyDeleteSo many great ideas! You are amazing!
ReplyDeleteKrista
Teaching Momster
What fun! Great ideas for young learners. Many thanks, Sandy
ReplyDeleteThank you for sharing all of your ideas, I think we will be using some of them this year for sure!
ReplyDeleteYou are such a busy lady! Thanks for providing these terrific Chicka Chicka Boom Boom ideas! I will be adding some of them to the lesson plans!
ReplyDeleteKay @ Sommer Pride
OMG this is amazing!!! I will share this post with my Kindergarten friends!!! Your boys are just adorable!!!! Thanks!!!
ReplyDeleteWow! So many great ideas! I am saving these for next summer with my little girl!!
ReplyDeleteThanks for sharing!
Andrea
Reading Toward the Stars
What a great post! Love the palm tree and Cheez-It idea to try! Thanks to all for a great giveaway! :)
ReplyDeleteThis comment has been removed by a blog administrator.
ReplyDeleteGreat post on "Cooking up a great year". As a professional chef i have to appreciate your work. Keep Posting useful posts like this. Keep in touch with my websites- piping institute in dubai | piping institutes dubai
ReplyDeleteReally enjoyed reading this post! If you’re into games of chance, keeping an eye on the mega millions winning numbers might just spark your next big dream.
ReplyDelete